%201.png)
Above Ground Pool Sand Filter Troubleshooting 101
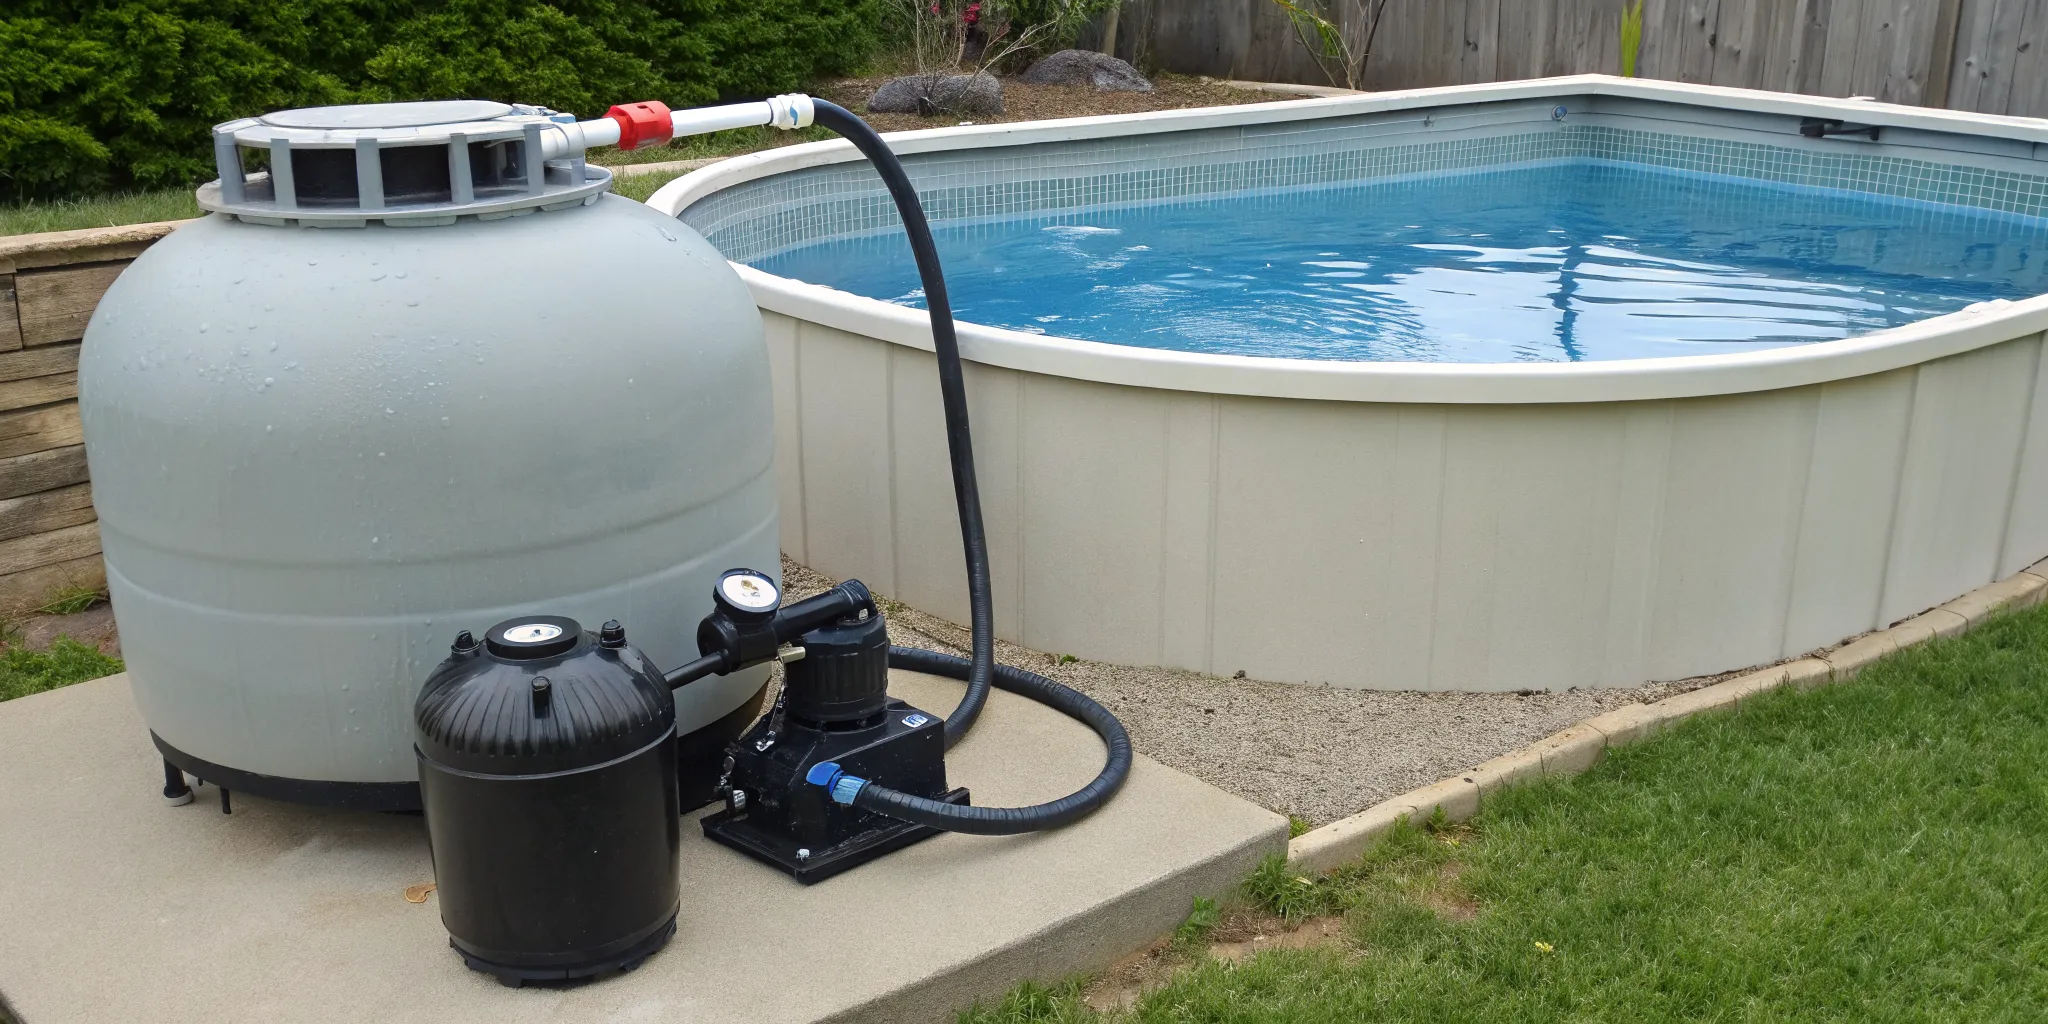
Your pool’s sand filter is the quiet workhorse that keeps your water crystal clear. But when things go wrong, it can bring your summer fun to a screeching halt. Suddenly you’re dealing with cloudy water, weak jets, or even sand at the bottom of your pool. Don’t panic. Many of these issues are common and have straightforward solutions you can handle yourself. This guide is your go-to resource for effective above ground pool sand filter troubleshooting. We’ll walk you through the most frequent problems, from high pressure readings to mysterious leaks, giving you the confidence to diagnose and fix them quickly.
Key Takeaways
- Learn to read your filter's signals: Your filter will tell you when it needs help. High pressure on the gauge means it's time to backwash, cloudy water indicates the sand is no longer effective, and sand on the pool floor points to a broken internal part.
- A simple maintenance routine is key: You can prevent most common issues with consistent care. This includes regular backwashing based on pressure readings, keeping skimmer and pump baskets clear, and replacing the filter sand every three to five years to maintain water clarity.
- Don't hesitate to call a professional for big jobs: While you can handle basic upkeep, it's smart to call for expert help with complex issues. Leave tasks like replacing broken laterals, installing a new filter tank, or any repair involving plumbing and electrical work to a certified technician.
5 Telltale Signs Your Sand Filter Needs Help
Your sand filter is the unsung hero of your pool, working tirelessly to keep the water clear and inviting. But like any hard-working equipment, it eventually shows signs of wear. Catching these signals early can save you from bigger headaches and costly fixes down the road. If you notice your pool isn't looking its best, your filter might be trying to tell you something. Let's walk through the five most common signs that your sand filter needs a little attention.
Is Your Pool Water Stubbornly Cloudy?
You’ve balanced the chemicals perfectly and skimmed every last leaf, but the water is still hazy. What gives? Persistent cloudiness is a classic sign that your filter is no longer trapping fine debris effectively. Over time, the sand inside your filter can become greasy, clumped, or worn down, losing its sharp edges that catch particles. Water can also carve channels through the sand, creating tiny rivers that allow debris to pass right through and back into your pool. If your water stays cloudy even after a good cleaning, it’s a strong indicator that the filter sand needs a deep clean or a complete replacement. Our cleaning and maintenance services can get your water back to being crystal clear.
Noticing Weak Water Flow from Your Jets?
Take a look at the return jets where filtered water re-enters your pool. Is the flow weak or sluggish? This drop in pressure often points to a problem with your filtration system. It could mean the filter is clogged with dirt and debris, which increases the internal pressure and restricts water flow. A quick look at your pressure gauge will confirm this; if the reading is 8-10 PSI above its clean starting pressure, it’s time to backwash. On the other hand, a pool filter troubleshooting guide notes that unusually low pressure can signal a clog before the filter, like a full skimmer basket or a blocked pump impeller.
Hearing Strange Noises from Your Filter?
Your pool equipment should produce a consistent, low hum, not a symphony of strange noises. While the filter tank itself is silent, the pump connected to it can get loud when something is wrong. Grinding or screeching sounds often point to worn-out motor bearings inside the pump. A loud, rumbling noise could be cavitation, which happens when the pump is starved for water due to an air leak or a blockage. Don't ignore these sounds. They’re your system’s way of crying for help and often signal that a part is about to fail. It’s best to shut the system down and call for professional equipment repairs to diagnose the issue.
Finding Sand at the Bottom of Your Pool?
Discovering a small pile of sand on your pool floor is an immediate red flag. This almost always means a component inside your filter tank is broken. The most common culprit is a cracked or broken lateral, which is one of the small, slotted pipes at the bottom of the filter that holds the sand in place while letting clean water pass through. A damaged standpipe (the central pipe the laterals connect to) can also cause this issue. Unfortunately, this isn't a quick fix. It requires emptying all the sand from the tank to access and replace the broken parts, a job that’s often best left to a professional.
Are Your Pressure Gauge Readings Off?
The pressure gauge is your filter’s dashboard, and its readings tell you what’s happening inside. As mentioned, high pressure means it's time to backwash. But what if the gauge reads zero while the pump is running? This doesn't mean there's no pressure; it usually means the gauge itself is broken or the small opening leading to it is clogged. An accurate pressure reading is essential for knowing when to perform routine maintenance, so a broken gauge should be replaced right away. If your gauge is acting up, our team can quickly handle the repair and get your system back on track.
How to Find and Fix Sand Filter Leaks
Discovering a leak in your pool's sand filter can feel like a major setback, but it’s often a problem you can diagnose with a little detective work. A leak not only wastes water but can also damage your equipment and the surrounding area if left unchecked. The key is to systematically find the source of the water and determine if it’s a simple fix or something that requires a professional touch. Most leaks originate from just a few common spots, like worn-out seals, loose connections, or cracks in the filter body itself.
Before you start, make sure to turn off the pool pump at the breaker to work safely. Grab a flashlight, even if it’s daytime, as it can help you spot slow drips and moisture in tight spaces. We’ll walk through the most common culprits, starting with the easiest fixes and moving on to more complex issues. If you follow these steps, you’ll have a clear idea of what’s causing the leak and what you need to do to get your system back in top shape. For major issues, remember that our team is always ready to handle professional equipment repairs and servicing.
Check for Drips Around Fittings and Hoses
The first and simplest step is to perform a thorough visual inspection of your entire filter system. Look closely at where the hoses and pipes connect to the filter tank and the multiport valve. Often, a leak is caused by nothing more than a loose clamp or a fitting that has vibrated loose over time. Run your hand along the underside of these connections to feel for moisture. If you find a drip, try tightening the clamp or fitting. Sometimes, this is all it takes to solve the problem. If the connection is threaded, you may need to re-seal it with plumber's tape.
Inspect Gaskets and O-Rings for Wear and Tear
If all your connections are tight but you still have a leak, the next place to look is the gaskets and O-rings. These small rubber seals are essential for creating a watertight barrier, but they can dry out, crack, and lose their shape over time. The most common failure point is the multiport valve’s spider gasket or the O-ring on the filter lid. A leak from the backwash line or around the top of the valve is a strong indicator that one of these seals has failed. You can often troubleshoot these common problems by replacing the worn-out gasket, which is a relatively straightforward job.
Look for Cracks in the Filter Tank
A crack in the filter tank itself is a more serious issue. These can be caused by freeze-thaw cycles here in Colorado, sun exposure, or simple aging. Carefully inspect the entire body of the filter tank, paying special attention to the seams and the area around the fittings. While it might be tempting to try a quick patch with epoxy or sealant, this is not a safe or permanent solution. The high pressure inside the tank means that a patch is likely to fail, and a ruptured tank can cause serious damage. A cracked tank requires a complete filter replacement to ensure your system operates safely and effectively.
Replace Worn-Out Seals and Parts
Beyond the main gaskets and O-rings, other internal parts can wear out and contribute to leaks or poor performance. This includes components like the laterals at the bottom of the tank, which can crack and allow sand to escape into your pool. If you have the filter open to replace a gasket, it’s a good idea to inspect all the internal components for signs of wear or damage. Replacing any worn-out seals or broken parts proactively can prevent future leaks and bigger headaches down the road. It’s a small step that helps maintain the long-term health of your filtration system.
Got Sand in Your Pool? Here's What to Do
Finding a layer of sand at the bottom of your pool is more than just an annoyance; it’s a clear signal that your sand filter isn’t working correctly. When your filter is operating as it should, the sand stays inside the tank, trapping dirt and debris. If sand is escaping, it means there’s a breach somewhere inside the filter. Don’t worry, this is a common issue that can often be fixed. Let’s walk through the likely culprits and what you can do to solve the problem.
Identify Broken or Cracked Laterals
The most frequent cause of sand in the pool is a broken or cracked lateral. Laterals are the slotted, finger-like tubes at the bottom of your filter tank that connect to a central standpipe. Their job is to allow filtered water to pass through while keeping the sand contained. Over time, these plastic parts can become brittle and crack. The telltale sign is sand shooting out of your return jets and settling on the pool floor. You might also find yourself vacuuming the same spots near the returns over and over again. If you see this, it’s a strong indication that one or more of your laterals has failed and needs to be replaced.
Check the Standpipe for Damage
If the laterals look fine, your next stop is the standpipe. This is the central pipe inside the filter that the laterals attach to. A crack in the standpipe can also create an escape route for sand to get pushed back into your pool with the clean water. Just like the laterals, the standpipe can degrade over time due to age and constant pressure. When you have the filter open to inspect the laterals, take a close look at the standpipe for any visible cracks or breaks. Finding and fixing this kind of issue is a key part of our equipment repairs and servicing, as it’s crucial for your filter’s performance.
Inspect the Sand for Clumping or "Channeling"
Sometimes, the problem isn't a broken part but the sand itself. Over several years, the sharp edges of the filter sand wear down, becoming too smooth to effectively trap debris. The sand can also calcify, forming hard, solid clumps. When this happens, the water can carve pathways, or "channels," right through the sand bed instead of filtering through it evenly. This process not only lets dirt pass through but can also carry sand along with it. If you open your filter and see clumps or deep grooves in the sand, it’s a definite sign that it’s time for a sand change, which is a vital part of routine pool cleaning and maintenance.
A Quick Guide to Replacing Laterals and the Standpipe
If you’ve confirmed you have broken laterals or a cracked standpipe, you’ll need to replace them. It’s a manageable job, but it does require some heavy lifting. First, turn off your pool pump and release any pressure from the filter tank. Next comes the tough part: scooping all the old sand out. Once the tank is empty, you can get a clear view of the laterals and standpipe assembly. Carefully unscrew the laterals from the central hub and inspect each one for damage, replacing any that are cracked. Do the same for the standpipe. If this sounds like more work than you want to handle, our team is always ready to help with professional equipment repairs.
How to Troubleshoot Filter Pressure Issues
Your filter’s pressure gauge is like a speedometer for your pool’s circulation system. It tells you how hard the pump is working to push water through the sand. When the reading is too high or too low, it’s a clear signal that something needs your attention. Understanding what these readings mean is the first step to getting your filter back on track and your water sparkling again. Instead of guessing, you can use the gauge to diagnose the problem and find the right solution, saving you time and frustration.
Know Your System's Normal Pressure Range
First things first, you need to know your filter’s baseline. After you’ve just backwashed the filter or installed fresh sand, turn on the pump and take note of the pressure gauge reading. This is your "clean" pressure. For most sand filters, this will fall somewhere between 10 and 25 PSI. I recommend writing this number down with a permanent marker right on the filter tank. This baseline is your single most important tool for troubleshooting. Any time you suspect a problem, you can compare the current reading to your clean pressure to figure out what’s going on.
Fix High Pressure with a Proper Backwash
If your pressure gauge is reading 8 to 10 PSI higher than your clean baseline, it’s telling you the filter is full of dirt and debris. This is the most common filter issue, and luckily, the fix is usually simple: it’s time to backwash. Backwashing reverses the flow of water through the filter, flushing all the trapped gunk out through the waste line. If a good backwash doesn't bring the pressure back down, the sand itself might be the problem. Over time, it can get clumped together, which is a sign it needs a deep cleaning or a complete replacement.
Solve Low Pressure by Clearing Blockages
Low pressure is the opposite problem. Instead of a clog inside the filter, low pressure usually means water isn’t getting to the filter fast enough. Before you panic, start with the simple checks. Is your pool water level high enough? If it drops below the skimmer opening, the pump will start pulling in air instead of water, causing a significant drop in pressure. You should also check for any blockages that could be slowing things down. The most common culprits are the skimmer and pump baskets, which are designed to catch large debris before it reaches your filter.
Clear Out Clogged Skimmer and Pump Baskets
Your skimmer and pump baskets are your filter’s first line of defense. When they get clogged with leaves, twigs, and other debris, they can starve the pump for water, leading to low pressure and poor circulation. Cleaning them is a quick and easy part of regular pool care. Just turn off the pump, empty the skimmer basket by the pool’s edge, and then open the pump lid to clean out the pump basket. Making this a weekly habit can prevent a lot of pressure headaches. If you'd rather have a professional handle your routine upkeep, our cleaning and maintenance services can keep your system running smoothly.
What if the Pump Works on "Recirculate" but Not "Filter"?
This is a classic diagnostic test. If you switch your multiport valve to "Recirculate" and the water flow returns to normal, you’ve confirmed the problem is inside the filter tank. The "Recirculate" setting bypasses the filter sand entirely, sending water directly from the pump back to the pool. If it works fine on this setting but not on "Filter," you’re likely dealing with a serious clog or compacted sand. This can be a tricky fix, so if you’ve already tried backwashing, it might be time to call in the experts for equipment repairs.
Why Is Debris Blowing Back into Your Pool?
It’s incredibly frustrating to finish cleaning your pool, only to see a stream of fine dirt and debris blowing right back in through the return jets. If this is happening, don’t worry, you’re not alone. This common problem almost always points to an issue within your sand filter system. It means that for some reason, water is bypassing the filter media and returning to the pool without being properly cleaned. Let’s walk through the four most common reasons this happens and what you can do about it.
Diagnose a Faulty Multiport Valve
Your multiport valve is the traffic cop of your filtration system, directing water where it needs to go. If the internal gasket or seal wears out, it can create a small channel that allows unfiltered water to sneak past the sand and head straight back to your pool. You might notice the valve handle is loose or that water is leaking from the waste line even when it's not in the "backwash" setting. A visual inspection can sometimes reveal a worn-out gasket. While some parts are replaceable, a faulty valve often requires a full replacement, which is a job best left to a certified technician to ensure it’s installed correctly and doesn't cause bigger problems.
Check for Broken Internal Components
If you’re finding sand at the bottom of your pool, a broken internal component inside the filter tank is the most likely culprit. At the bottom of your sand filter is a set of small pipes with tiny slits, called laterals. Their job is to let clean water through while keeping the sand in. Over time, these plastic parts can become brittle and crack, especially with Colorado's temperature swings. When a lateral breaks, it creates an open path for sand to escape the tank and get pushed into your pool. Replacing laterals requires emptying the entire filter tank, which can be a heavy, messy job. If you suspect a broken lateral, our team can handle the equipment repairs and servicing for you.
Always Use the "Rinse" Cycle After Backwashing
Backwashing is essential for cleaning your sand filter, but the step that comes right after is just as important. After you finish backwashing, you should always run the "rinse" cycle for 30 to 60 seconds. Backwashing fluffs up and churns the sand, which is great for releasing trapped dirt, but it leaves the sand bed unsettled. If you switch directly from "backwash" to "filter," that loose cloud of dirt and fine sand gets blasted right back into your pool. The rinse cycle resettles the sand and sends that initial burst of dirty water out the waste line, not into your clean pool. Make it a habit to watch the sight glass and rinse until the water runs clear.
Find and Seal Air Leaks in the System
An air leak on the suction side of your pump (the pipes leading into it) can also cause debris to return to the pool. When air gets sucked into the system, it reduces the pump's efficiency and can disrupt the steady flow of water through the filter. This inconsistent pressure can disturb the sand bed just enough to let fine debris pass through. You can spot an air leak by looking for tiny bubbles in your pump basket or hearing a hissing sound near the pump when it’s running. The most common source is a worn-out pump lid O-ring or loose threaded fittings. Sealing these leaks will restore proper pressure and improve your filter’s performance.
Keep Your Sand Filter Healthy: A Maintenance Checklist
Think of your sand filter as the unsung hero of your pool system. It works tirelessly behind the scenes to keep your water sparkling clean, but just like any hard-working equipment, it needs a little TLC to perform at its best. Sticking to a simple maintenance routine will not only extend the life of your filter but also save you from the headache of dealing with cloudy water and costly repairs down the road. A healthy filter means a healthy pool, giving you more time to relax and enjoy the water.
This checklist breaks down the essential tasks for keeping your sand filter in top shape. These are straightforward steps you can take to prevent common problems before they start. From regular backwashing to seasonal check-ups, each task plays a crucial role in your pool's overall health. By making these habits part of your regular pool care, you ensure your filter operates efficiently all season long, which is especially important with Colorado's variable weather. If you ever feel overwhelmed, remember that professional cleaning and maintenance services are always an option.
Stick to a Regular Backwashing Schedule
Backwashing is essentially a deep cleaning for your sand filter. It reverses the water flow to flush out all the dirt, debris, and contaminants the sand has trapped. So, how often should you do it? The best indicator is your pressure gauge. After you’ve cleaned your filter, take note of the pressure reading; this is your "clean" baseline. A good rule of thumb is to backwash whenever the gauge reads 8-10 PSI above that starting pressure. This tells you the filter is getting full and is working harder to push water through. Sticking to this schedule keeps your water circulating properly and your filter working effectively.
Plan to Replace the Sand Every 3-5 Years
Yes, the sand inside your filter needs to be replaced. Over time, the constant flow of water wears down the sharp edges of the sand particles, making them smooth and round. When this happens, the sand loses its ability to trap fine debris, and you might notice your pool water isn't as clear as it used to be, no matter how often you backwash. For most residential pools in Colorado, you should plan on replacing the sand every three to five years. It’s a bigger job than routine backwashing, but it’s essential for maintaining optimal filtration and water clarity for the long haul.
Maintain Proper Water Levels and Chemistry
Your pool's water chemistry and your filter's health are directly linked. When your water is properly balanced, it helps protect your entire pool system, including the internal components of your filter. Unbalanced water can be corrosive or lead to scale buildup, which can damage gaskets, O-rings, and even the filter tank itself. Make it a habit to test your water regularly and keep the levels in the ideal range. Having the right supplies and chemicals on hand makes this task much easier and ensures a safe, clean swimming environment for everyone.
Run Your Pump Long Enough Each Day
Your filter can't do its job if water isn't moving through it. Your pool pump is what makes that happen, circulating the entire volume of water through the filtration system. To keep your pool clean, you need to run your pump long enough each day to turn over all the water at least once. For most pools, this means running the pump for about 8 to 12 hours daily. This consistent circulation prevents debris from settling and algae from taking hold, allowing your sand filter to effectively capture any impurities and keep your water crystal clear.
Complete a Seasonal Inspection
A quick seasonal inspection can help you catch small issues before they become major problems. When you open your pool for the summer and before you close it for the winter, take a few minutes to look over your filter system. Check the pressure gauge to ensure it's working correctly and that your water is clear. Look for any drips or leaks around the multiport valve, fittings, and hoses. Listen for any unusual noises coming from the system when it’s running. This simple check-up gives you peace of mind and is a great way to stay ahead of potential equipment repairs.
When to Hand It Over to the Pros
While tackling pool maintenance yourself can be rewarding, some sand filter problems are best left to the experts. Knowing when to step back and call for backup not only saves you time and frustration but also ensures the job is done safely and correctly. If you find yourself in over your head with a complex issue, or if a repair involves specialized systems, it’s a smart move to get a professional opinion. Our Colorado-based team has seen it all, from minor leaks to major system failures, and we have the right tools and experience to get your pool back in perfect shape. Don’t hesitate to reach out when a DIY fix turns into a major project.
For Complex Repairs That Need Special Tools
Some filter issues require more than a standard toolbox and a can-do attitude. If you’re dealing with a problem that needs specialized diagnostic equipment or specific parts that aren’t readily available, it’s time to call in a professional. Trying to force a fix without the right gear can lead to bigger, more expensive problems down the road. Our certified technicians are equipped to handle these tricky situations efficiently. We can quickly diagnose the root cause and perform the necessary equipment repairs, saving you the headache of tracking down rare components or attempting a repair that could damage your system further.
When You're Replacing Major Equipment
If you discover a major issue, like a crack in the main filter tank, you’re likely looking at a full system replacement. This is a large-scale job that involves carefully disconnecting the old unit and ensuring the new one is installed perfectly to prevent leaks and ensure optimal performance. A proper installation is key to the longevity and efficiency of your new filter. This is a great time to lean on professional expertise. We can help you select the right filter for your pool’s needs and manage the entire replacement process, making sure every connection is secure and your system runs smoothly from day one.
For Any Job Involving Electrical or Plumbing Work
Safety should always be your top priority, especially when a repair involves your pool’s electrical or plumbing systems. While turning off the power at the breaker is a crucial first step for any filter work, tasks that require rewiring or altering plumbing lines should be handled by a trained professional. Water and electricity are a dangerous combination, and a small mistake can have serious consequences. Our team is experienced in safely managing these high-stakes repairs, ensuring everything is up to code and your pool remains a safe place for everyone to enjoy.
Frequently Asked Questions
How often should I actually backwash my sand filter? While the most accurate signal is your pressure gauge (backwash when it’s 8-10 PSI above its clean reading), a general timeframe can be helpful. For most pools in Colorado, this works out to be about every one to two weeks during the peak swimming season. If you've had a big storm, a lot of swimmers, or an algae bloom, you will likely need to backwash more frequently to clear out the extra debris.
Is changing the filter sand a DIY project? It can be, but it's a physically demanding job. The process involves scooping out hundreds of pounds of wet, heavy sand, inspecting the internal parts like the laterals for damage, and then carefully adding the new sand. It’s a messy and time-consuming task. If you're short on time or prefer not to do the heavy lifting, our professional team can handle the sand change for you quickly and correctly.
What's the difference between the "rinse" and "recirculate" settings on my valve? These two settings serve very different purposes. You should always use "rinse" for about 30 to 60 seconds immediately after backwashing. This resettles the sand bed and flushes out any remaining loose debris to the waste line, preventing it from blowing back into your pool. "Recirculate," on the other hand, bypasses the filter entirely. It's used to circulate water and chemicals quickly without filtering, which is useful after adding certain treatments.
My pressure gauge always reads zero. Is that a problem? Yes, a gauge that reads zero while the pump is running is a definite problem. It doesn't mean there's no pressure in the tank; it almost always means the gauge itself is broken or the small port it screws into is clogged. An accurate pressure reading is your best tool for knowing when your filter needs maintenance, so you should have a non-working gauge replaced as soon as possible.
Can I just use a sealant to fix a small crack in my filter tank? It might seem like a quick fix, but patching a filter tank is not a safe or lasting solution. The tank operates under high pressure, and a patch is very likely to fail, which could lead to a sudden rupture and damage your other equipment. For safety and peace of mind, a cracked tank always requires a full replacement.
Related Blogs