%201.png)
The Complete Guide to Saltwater Pool Conversion
Think about the feeling of the water after you’ve just shocked your pool. It can feel harsh, smell strongly of chemicals, and leave your skin feeling dry. Now, contrast that with water that feels soft, silky, and gentle on your skin and eyes. This noticeable difference in comfort is the number one reason so many Colorado homeowners choose a saltwater pool conversion. The change comes from a more stable, consistent level of pure chlorine that a salt generator produces. It creates a more luxurious and pleasant swimming experience for everyone. This article will explain exactly how this system works and what you can expect from the process.
Key Takeaways
- Saltwater systems create their own chlorine: This automated process results in softer, silkier water that is much gentler on your skin, hair, and eyes compared to the harshness of traditional chlorine tablets.
- Your maintenance routine simplifies, but doesn't disappear: You'll trade daily chlorine additions for new tasks like monitoring pH levels, testing salt concentration, and cleaning the salt cell every few months to keep it working properly.
- A successful conversion requires smart preparation: Ensure a smooth transition by choosing a generator rated for a larger pool than you have, confirming your current equipment is compatible, and installing a sacrificial anode to protect metal parts from corrosion.
Saltwater vs. Chlorine Pools: What's the Difference?
When you hear “saltwater pool,” you might picture swimming in the ocean. But the reality is much more comfortable, and surprisingly, it’s not about eliminating chlorine. The biggest difference between the two systems is how the chlorine gets into your pool. With a traditional chlorine pool, you manually add chlorine tablets or liquid to sanitize the water. A saltwater pool, on the other hand, creates its own chlorine through a process called electrolysis.
This is done with a piece of equipment called a salt chlorine generator. You add special, pool-grade salt to the water to create a mild saline solution, and the generator does the rest. This creates a more stable, consistent level of sanitizer in your pool, which means you can say goodbye to the harsh chemical smells and fluctuations common with traditional chlorine. It’s a simpler, more hands-off approach to sanitation that many Colorado pool owners prefer for its convenience and comfort.
How Saltwater Systems Actually Work
The magic behind a saltwater pool is the salt chlorine generator, or salt cell. This device is installed directly into your pool's plumbing system. After you dissolve pool-grade salt in the water, the generator uses a low-voltage electrical charge to convert the salt and water into chlorine. This freshly produced chlorine sanitizes your pool by neutralizing bacteria and algae, then reverts back to salt, and the cycle begins again. It’s a closed-loop system that provides a steady, reliable supply of sanitizer. Best of all, converting your pool is straightforward and doesn't require draining the water you already have.
The Feel of the Water: Salt vs. Chlorine
One of the first things people notice after switching to a saltwater system is how much better the water feels. The mild saline solution makes the water feel soft and silky, which is a huge upgrade from the often harsh feel of traditionally chlorinated water. This softer water is much gentler on your skin and hair, leaving them feeling moisturized instead of dry and brittle. It’s also less likely to cause red, irritated eyes, making it a more comfortable swimming experience for everyone, especially kids who love to spend hours in the pool. Many owners also report that their water looks clearer and more sparkling.
Busting Common Saltwater Pool Myths
Let’s clear up a few common misconceptions about saltwater pools. First, they are not chlorine-free; they just produce their own chlorine in a smarter way. Second, they aren't maintenance-free. While daily chemical handling is reduced, you still need to monitor pH and alkalinity, and the salt cell requires periodic cleaning and eventual replacement. Finally, the saltiness is nothing like the ocean. The salt concentration is so low (about 1/10th the salinity of the ocean) that you can barely taste it. One valid concern is that salt can be corrosive to some metals, so ensuring your pool equipment is compatible is an important step. Proper cleaning and maintenance helps protect your investment for years to come.
Why Make the Switch to a Saltwater Pool?
If you're tired of the constant chlorine balancing act, you’ve likely heard about saltwater pools. Converting your traditional pool is a popular upgrade for Colorado homeowners, and for good reason. It’s not about swimming in ocean water; it’s about a smarter, more comfortable way to keep your pool clean. A salt chlorine generator uses a low level of dissolved salt to produce its own chlorine, creating a stable and pleasant swimming environment. Let's look at the key benefits you can expect.
Enjoy Softer, Gentler Water
The first thing you’ll notice is how different the water feels. Saltwater pools are known for their silky, soft water that’s gentler on your skin, hair, and eyes. Because the system produces a steady, consistent level of chlorine, you avoid the harshness of traditional shock treatments. This means no more red, itchy eyes or that dry-skin feeling after a swim. You can also say goodbye to the strong chemical smell and faded swimsuits. It’s a more natural and comfortable swimming experience for everyone in the family.
Simplify Your Maintenance Routine
Imagine spending less time adding chemicals and more time enjoying your pool. A salt chlorine generator automates chlorine production, so you no longer have to buy, store, or handle heavy buckets of chlorine tablets. While it’s not completely hands-off, the routine is much simpler. You’ll still need to test your water chemistry, but the daily task of chlorination is handled for you. This consistent sanitization also helps prevent algae growth, making your overall cleaning and maintenance schedule much more manageable.
Understanding the Long-Term Value
Converting to a saltwater system does have an upfront equipment cost. You’ll need to purchase and install a salt chlorine generator, and its salt cell will need to be replaced every three to seven years. However, it’s helpful to see this as an investment. Over the life of the system, you’ll save a significant amount of money by not having to purchase chlorine every season. When you factor in the reduced spending on supplies and chemicals and the value of your own time, the long-term benefits become clear. It’s a smart upgrade that adds enjoyment to your pool for years to come.
What to Expect for Your Saltwater Conversion
Making the switch to a saltwater system is an exciting upgrade for your pool, but it helps to go in with a clear picture of the process. The conversion involves more than just pouring salt into your water. It requires new equipment, a slight shift in your maintenance routine, and a few important considerations to ensure everything goes smoothly.
From the initial installation to the long-term care, understanding the full scope of the project is key. We’ll walk through the equipment you’ll need, how your weekly upkeep will change, and some important details about warranties and water chemistry. This way, you can decide with confidence if a saltwater conversion is the right move for your Colorado pool. The good news is that the process is straightforward, and the result is silky, comfortable water you can enjoy all season long.
Upfront Equipment and Installation
The heart of any saltwater pool is the salt chlorine generator, also called a salt chlorinator. This device is the main piece of equipment you'll need for the conversion. It works by using the salt in the water to produce its own chlorine, keeping your pool sanitized. The generator itself is installed directly into your pool's existing plumbing, a process that is usually quick and doesn't require draining your pool.
Once the generator is in place, the next step is to add high-purity, pool-grade salt directly to the water to reach the ideal concentration. The total investment for the equipment and initial salt supply typically falls between $1,500 and $2,500. While some homeowners tackle this as a DIY project, having a professional handle the remodels and rehabs ensures the plumbing and electrical work are done correctly from the start.
Comparing Ongoing Maintenance Needs
While you can say goodbye to buying and handling liquid chlorine or tablets, a saltwater pool isn't completely hands-off. Your maintenance routine will simply change. Instead of adding chlorine, you’ll monitor salt levels and check your salt chlorine generator. The generator’s salt cell, which does the work of converting salt to chlorine, will need to be inspected and cleaned periodically to remove mineral buildup.
Saltwater systems also tend to cause the pool’s pH to rise over time. You’ll need to test your water regularly and add muriatic acid as needed to keep the chemistry balanced. The salt cell itself is a workhorse, but it doesn’t last forever. You can expect to replace it every three to seven years. Our team can easily incorporate these new tasks into a regular cleaning and maintenance schedule.
What to Know About Warranties and Other Factors
Before you commit to a conversion, it’s smart to do a little homework on your existing pool setup. First, check the warranties on your current equipment, like your heater, pump, or filter. Some manufacturers may void their warranties if the equipment is used in a saltwater environment, so it’s best to confirm this ahead of time.
You also need to know what kind of sanitizer is currently in your pool. If you’ve been using a biguanide sanitizer (often sold under brand names like Baquacil or SoftSwim), you cannot simply convert. You will need to have the pool completely drained and refilled before installing a salt system. If you're unsure about your equipment's compatibility or need help with equipment repairs and servicing, a professional can assess your setup and give you clear guidance.
Your Saltwater Conversion Equipment Checklist
Getting your equipment and supplies in order is the first real step toward enjoying your new saltwater pool. Think of this as your project shopping list. Having everything on hand before you start makes the entire process smoother and helps you avoid any mid-installation trips to the store. The main event is choosing the right salt chlorine generator, but you’ll also need a few plumbing parts and, of course, the salt itself.
It’s also a good time to check that your existing equipment, like your pump and filter, is in good shape and compatible with a saltwater system. Most modern equipment is, but it never hurts to double-check. If you find that your setup could use an update or you just want a second opinion, our team can help you assess your system and source all the necessary supplies and chemicals for the job. A little preparation here goes a long way in making your conversion a success.
How to Choose the Right Salt Chlorine Generator
The salt chlorine generator, or salt cell, is the heart of your new system. It’s the device that magically turns simple salt into chlorine to keep your pool clean. When picking one out, the most important factor is size. A common rule of thumb is to choose a generator rated for a pool 1.5 to 2 times the actual volume of your pool. For example, if you have a 20,000-gallon pool, you’d want a generator rated for at least 30,000 gallons. This oversizing isn't about overkill; it ensures the system runs more efficiently and extends the life of your salt cell, saving you hassle down the road.
Other Components and Accessories You'll Need
Besides the salt cell, you'll need a few other items to complete the installation. Most of these are standard plumbing supplies. You’ll want to grab some PVC pipe, couplers, and adapters to fit the generator into your existing plumbing. A pair of PVC snips or a hacksaw will be necessary for cutting the pipe. Of course, you’ll also need the salt. Make sure you buy high-purity, pool-grade salt specifically designed for swimming pools. And finally, don’t forget safety gear. A pair of safety glasses and gloves is always a good idea when handling pool equipment and chemicals.
Checking Compatibility With Your Current Setup
Before you get started, take a moment to confirm your current setup is ready for the switch. The good news is you probably don’t need to drain your pool. Most chlorine pools can be converted directly. The major exception is if you use a sanitizer called biguanide. If your pool water has been treated with biguanide products, you will need to drain the pool completely before converting to salt. Mixing those chemicals can create a messy, complicated situation. If you’re unsure what’s in your water or need help with any part of the conversion, our remodels and rehabs team can handle it for you.
Your Step-by-Step Guide to Pool Conversion
Ready to make the switch? Converting your traditional chlorine pool to a saltwater system is a straightforward process that can be broken down into a few key stages. This project is completely manageable, and understanding the steps will give you a clear picture of what the project involves, whether you plan to do it yourself or hire a professional. One of the best parts is that you don’t have to drain your pool to get started. The entire conversion really just comes down to balancing your water chemistry and installing one key piece of equipment: the salt chlorine generator.
Before you begin, it’s a great idea to inspect your existing pool equipment. Make sure your pump, filter, and plumbing are all in good working order. A saltwater system relies on proper circulation to work effectively, so a healthy pump is non-negotiable. If you notice any leaks, hear unusual noises from your equipment, or suspect something isn't right, it’s best to handle those repairs first. Think of it as building on a strong foundation. Once you’ve confirmed everything is running smoothly, you can move forward with confidence. This guide will walk you through each phase, from testing your water to firing up your new system for the first time.
Step 1: Test and Prepare Your Pool Water
Before you add a single grain of salt, you need to make sure your pool water is perfectly balanced. Think of this as creating a clean slate for your new system to work effectively from day one. Grab your water testing kit and check the levels. You’re aiming for a Total Alkalinity between 80 and 120 ppm and a pH between 7.4 and 7.6. Your Calcium Hardness should be 200 to 400 ppm, and Cyanuric Acid (CYA) should fall between 30 and 50 ppm. Finally, ensure your Free Chlorine is between 2.0 and 4.0 ppm. Adjusting these levels now will prevent headaches later and help your new equipment perform at its best.
Step 2: Install the Salt Chlorinator
The salt chlorinator, also known as a salt cell, is the heart of your new system. This device is installed into your pool’s plumbing, typically after the filter and heater. While you don’t need to drain your pool for this step, you will be cutting into your PVC pipes, so it’s important to be precise. Always follow the manufacturer’s instructions carefully, as each model has specific requirements for placement and wiring. If you’re not comfortable with plumbing or electrical work, this is the perfect time to call in a professional. Proper installation is key to the system’s longevity and performance, ensuring you get the most out of your investment.
Step 3: Add Pool-Grade Salt the Right Way
Once your chlorinator is installed, it’s time to add the salt. It’s crucial to use only high-purity, pool-grade salt, which you can find at any pool supply store. Your salt chlorinator’s manual will tell you exactly how many pounds of salt you need based on your pool’s volume in gallons. To add it, simply pour the salt into the shallow end of your pool and use a pool brush to help it dissolve. Spreading it around helps it mix into the water faster. Be patient, as it can take up to 24 hours for the salt to dissolve completely. Keep your pump running during this time to circulate the water.
Step 4: Start and Calibrate Your New System
With the salt dissolved and circulating, you’re ready for the final step. Turn on your salt chlorinator and follow the manufacturer’s instructions to calibrate it. This usually involves adjusting the chlorine output based on your pool’s needs. The system will now use the salt in the water to generate its own pure chlorine, keeping your pool sanitized automatically. It might take a day or two of minor adjustments to find the perfect setting for your pool. Once you’ve dialed it in, you can sit back, relax, and enjoy the soft, silky water of your newly converted saltwater pool.
Common Conversion Hurdles and How to Clear Them
Switching to a saltwater system is an exciting upgrade for your pool, but it’s not without a few potential bumps in the road. Knowing what to watch for can make the entire process smoother and help you avoid common frustrations. From simple installation missteps to protecting your equipment for the long haul, a little preparation goes a long way. Let’s walk through some of the most frequent challenges pool owners in Colorado face during conversion and cover exactly how to handle them so you can get back to enjoying your pool.
Avoid These Common Installation Mistakes
First things first, let’s clear up a big misconception: you do not need to drain your pool to convert it to saltwater. That’s a huge relief, right? One of the most critical steps is choosing a system that’s the right size for your pool. When in doubt, it’s often better to go slightly bigger to ensure it can keep up, especially during hot summer days. During installation, make sure the salt cell is the very last piece of equipment the water passes through before it flows back into the pool. This placement is key for the system to work correctly and efficiently, giving you the most accurate chlorine generation.
Tips for Balancing Your Water Chemistry
Before you add a single grain of salt, you need to test your pool water. Starting with balanced chemistry is non-negotiable for a successful conversion, as it helps the salt dissolve properly and prevents issues like scaling on your new equipment. Your goal is to get everything within the ideal ranges: pH between 7.4 and 7.6, and alkalinity between 80 and 120 ppm. Once your water is balanced and you’ve installed the new equipment, you can add the salt. After it’s in, run your pool pump for several hours. This helps the salt dissolve completely and mixes it evenly throughout the water. Proper cleaning and maintenance from day one sets your new system up for success.
Protecting Pool Parts from Corrosion
Salt is naturally corrosive to some metals, which is a valid concern for any pool owner. To protect your pool’s metal components, like ladders, lights, and heaters, you’ll want to install a sacrificial anode. Think of it as a shield for your more expensive equipment. This small, replaceable piece of metal is designed to corrode first, "sacrificing" itself to save your pump and heater from damage. It’s a simple, inexpensive part that can prevent costly equipment repairs down the line. Also, ensure your pool has a properly installed bonding wire to further protect against corrosion.
Is a Saltwater Conversion Right for Your Pool?
Finally, it’s worth taking a moment to decide if this change is truly the right fit. Converting to saltwater is a big step, and once you make the switch, it’s difficult to go back to a traditional chlorine system without completely draining the pool. It’s also important to consider your pool’s size. Salt systems are often designed for larger pools, so if you have a smaller one, you might end up with an oversized system that costs more to buy and maintain. Thinking through these factors will help you feel confident in your decision to pursue a pool remodel or rehab.
How to Maintain Your New Saltwater Pool
One of the biggest perks of a saltwater pool is simplified maintenance, but "low maintenance" doesn't mean "no maintenance." To keep that silky-smooth water sparkling clean, you just need to stay on top of a few key tasks. The three main areas to focus on are managing your water’s pH, keeping salt levels in the right range, and taking good care of your salt cell. Mastering this simple routine will ensure your pool stays healthy and ready for a swim.
Managing pH and Alkalinity
In a saltwater pool, the process that creates chlorine naturally causes the pH to rise. This is completely normal, but it’s something to watch. When pH gets too high, it can lead to skin irritation and cause cloudy water or scale buildup on your pool surfaces. To counteract this, keep either muriatic acid or dry acid on hand to gently lower the pH as needed. Regularly testing your water and making small adjustments is the key to keeping everything balanced. If you ever feel like you're playing a guessing game with your water chemistry, our cleaning and maintenance team can handle the balancing act for you.
Checking and Adjusting Salt Levels
Your salt chlorine generator needs a specific amount of salt in the water to work its magic. The sweet spot for most systems is between 2,500 and 3,500 parts per million (ppm). You’ll want to test your salt levels regularly, especially after heavy rain. When you need to add more, always use pool-grade salt. A great rule of thumb is to add a little less than you think you need, let it circulate for 24 hours, and then test again. It’s much easier to add more salt than it is to remove it. We can help you find the right supplies and chemicals to keep your levels perfect.
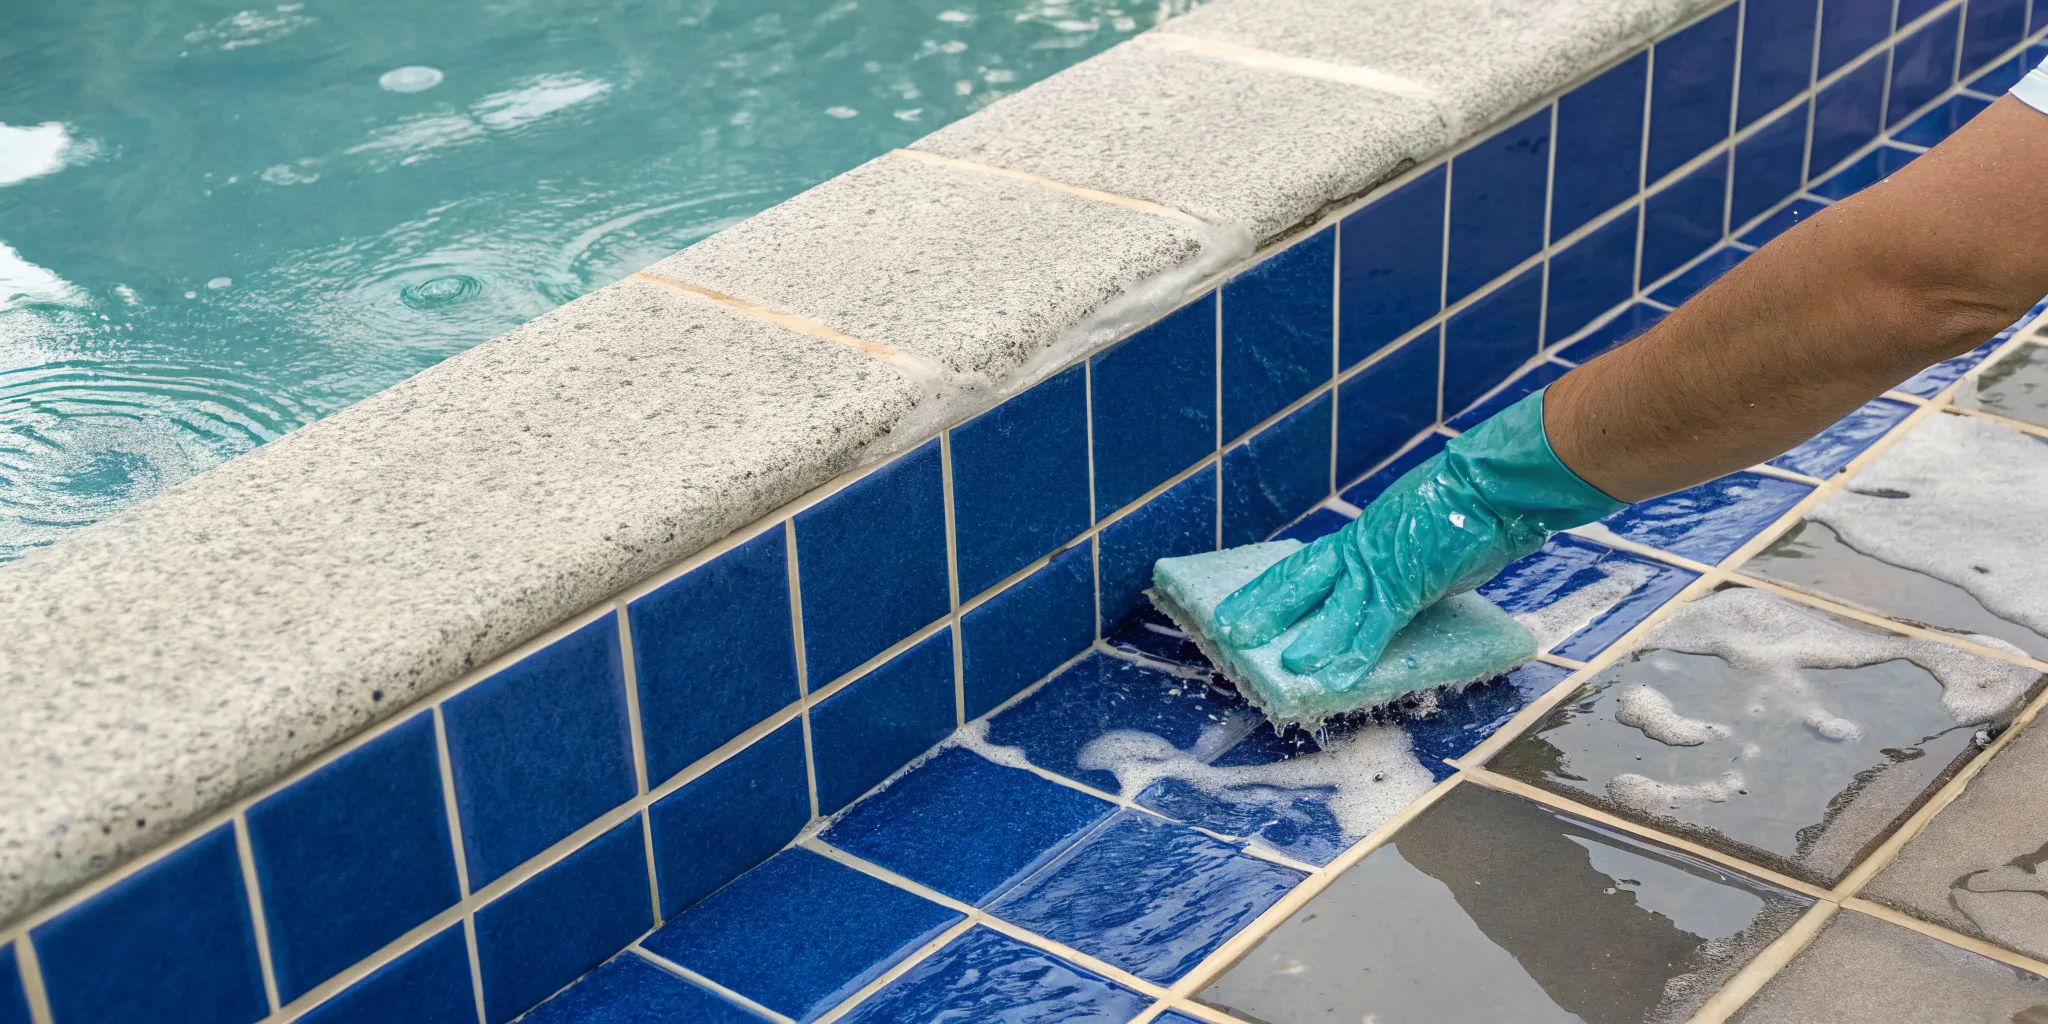
Caring for Your Salt Cell
The salt cell is the core of your entire system; it’s where salt is turned into chlorine. To keep it working efficiently, the cell needs to be inspected and cleaned regularly. During the swimming season here in Colorado, plan on cleaning it about every three weeks to remove any mineral buildup. This simple step can significantly extend its life. Most cells last between three and five years before they need to be replaced. When that time comes, it’s a straightforward swap. If you’re not comfortable with the replacement, our technicians are experts in equipment repairs and servicing and can get your system running again.
Your Ongoing Saltwater Pool Care Routine
Regular Testing and Monitoring
While your new saltwater system automates chlorine production, it doesn't automate water balance. You’ll still need to test your water regularly. Keep a close eye on pH, alkalinity, cyanuric acid (CYA), and of course, salt levels. A quality digital salt tester can give you the most accurate readings. Saltwater pools often have a higher pH, so it’s smart to have muriatic acid on hand to lower it as needed. Staying on top of your water chemistry prevents issues like algae growth and scaling, ensuring your pool water is always clear and comfortable. We can help you find the right testing kits and chemicals to keep everything perfectly balanced.
Seasonal Care for Colorado Pools
Living in Colorado means your pool care routine has distinct seasons. If you’ve just had your pool replastered, it’s important to wait one to two months before adding salt to allow the surface to cure properly. As winter approaches, your salt cell needs protection. In cold weather, the cell can’t produce chlorine effectively and can be damaged by freezing temperatures. A "dummy cell" is a simple replacement piece that keeps your plumbing intact while your expensive salt cell is safely stored for the winter. Proper seasonal adjustments are key to protecting your investment, and our cleaning and maintenance services can handle the opening and closing for you.
Basic Equipment Maintenance and Troubleshooting
Your salt chlorine generator is the heart of the system, and its main component, the salt cell, needs a little TLC. To help it last longer, inspect and clean the cell every few months during the swim season to remove any mineral buildup. A salt cell typically needs to be replaced every three to seven years. Another smart move is to install a sacrificial anode. This small zinc component corrodes instead of your pool’s other metal parts, like ladders, lights, and heater elements. It’s an easy way to prevent costly damage. If you ever need help with a cell cleaning or a full equipment repair or replacement, our certified technicians are ready to help.
DIY vs. Professional Conversion: Which is for You?
Once you’ve decided to make the switch to a saltwater pool, the next big question is how you’ll get it done. Should you roll up your sleeves and tackle it yourself, or call in a professional? The right answer really comes down to your comfort level with plumbing and electrical work, your budget, and how much time you want to spend on the project.
For some, the satisfaction of a DIY project is part of the fun of homeownership. For others, the peace of mind that comes with a professional installation is well worth the investment. Both paths can lead to a beautiful, perfectly functioning saltwater pool. Let’s walk through the key considerations for each approach so you can feel confident in your decision.
Deciding to DIY Your Conversion
If you’re comfortable with home improvement projects, a DIY saltwater conversion can be a very manageable task. The process generally involves installing a salt chlorine generator into your pool’s existing plumbing and then adding the correct amount of pool-grade salt directly to the water. For a handy pool owner, the main installation can often be completed in an hour or two without even needing to drain the pool. This approach allows you to save on labor costs and gives you a hands-on understanding of your new system. It’s a great option if you have a solid grasp of your pool’s setup and enjoy learning the ins and outs of its equipment.
The Benefits of Hiring a Professional
While a DIY conversion is possible, there are strong reasons to hire an experienced technician. A professional ensures that your new salt chlorine generator is sized correctly for your pool and integrated perfectly with your existing equipment. This is especially important in Colorado, where our unique climate can affect pool chemistry and equipment performance. A pro handles all the electrical work safely and can troubleshoot any unexpected issues that arise. Investing in professional remodels and rehabs for your pool conversion provides peace of mind, knowing the job is done right the first time and preventing potentially costly mistakes down the road.
How to Choose the Right Pool Service Partner
If you decide to go with a pro, finding the right partner is key. Look for a local company with certified technicians who have specific experience with saltwater conversions. A great partner will be transparent, answer all your questions, and provide a clear plan for the project. Before you begin, it’s also a good idea to ask them about your existing pool equipment warranties, as some manufacturers have specific clauses about modifications. Choosing a reliable team not only guarantees a smooth installation but also gives you a trusted resource for future equipment repairs and servicing, ensuring your saltwater pool stays in top condition for years to come.
Frequently Asked Questions
Is a saltwater pool really chlorine-free? This is one of the most common questions, and the simple answer is no. A saltwater pool is still a chlorine pool; it just has a smarter way of making its own sanitizer. Instead of you adding chlorine tablets or liquid, a device called a salt chlorine generator uses a small amount of dissolved, pool-grade salt to produce pure chlorine. This creates a more consistent and stable level of sanitizer, which is why the water feels softer and doesn't have that harsh chemical smell.
Will the salt damage my pool equipment or surfaces? It's true that salt can be corrosive to certain metals over time. However, this is a manageable concern. Most modern pool equipment is designed to be compatible with saltwater systems. To provide extra protection for metal components like ladders, handrails, and internal heater parts, you can install a sacrificial anode. This small, inexpensive zinc part is designed to corrode first, saving your more expensive equipment from potential damage.
How does my maintenance routine change after converting? Your routine will become simpler, but it won't disappear entirely. You can say goodbye to buying, storing, and handling chlorine. Instead, your main tasks will be to periodically check your salt levels and inspect your salt cell for mineral buildup, cleaning it a few times per season. You will also need to test your water chemistry regularly, as saltwater systems tend to make the pH rise over time. A little muriatic acid is usually all that's needed to keep it balanced.
Can any existing chlorine pool be converted to a saltwater system? Almost any traditional chlorine pool can be converted without needing to drain the water. The major exception is if your pool has been treated with a biguanide sanitizer, which is often sold under brand names like Baquacil or SoftSwim. Mixing the chemicals from a biguanide system with a new salt system can create significant problems. In that specific case, the pool must be completely drained and refilled before the conversion can happen.
What are the main costs involved in switching to saltwater? The primary upfront cost is for the salt chlorine generator and its installation. You will also need to purchase the initial supply of pool-grade salt to bring your water to the correct salinity. While this initial investment is higher than a season's worth of chlorine tablets, you'll see savings over time by no longer needing to buy sanitizer regularly. The salt cell itself will also need to be replaced every three to seven years, which is a long-term maintenance cost to keep in mind.
Related Blogs